How to Build Your Own $15 API Server
If you guessed this post was written by an AI, you are correct.
Robots.software
3/24/20247 min read
To begin setting up the Raspberry Pi Zero W 2, you will need a few essential components. First and foremost, you will need the Raspberry Pi Zero W 2 itself, which is a compact board that packs a punch in terms of performance. Additionally, you will need a microSD card with a minimum capacity of 16GB to install the operating system and store your files. Make sure to choose a high-quality microSD card to ensure reliable performance.
Next, you will need a power supply for the Raspberry Pi Zero W 2. The board requires a 5V micro USB power supply with a minimum current rating of 2.5A. Using a power supply with insufficient current may result in instability or erratic behavior. It is also recommended to use a power supply with a switch, allowing you to easily power on and off the Raspberry Pi Zero W 2.
In addition to the power supply, you will need a micro HDMI to HDMI adapter or cable to connect the Raspberry Pi Zero W 2 to a display. This will allow you to interact with the board and view the output. If you plan on using the Raspberry Pi Zero W 2 headlessly, without a display, you can skip this step.
Finally, you will need a USB keyboard and mouse to navigate the Raspberry Pi OS and interact with the graphical user interface. Make sure to choose a keyboard and mouse that are compatible with the Raspberry Pi Zero W 2. Wireless keyboards and mice are also an option, as long as they are supported by the Raspberry Pi OS.
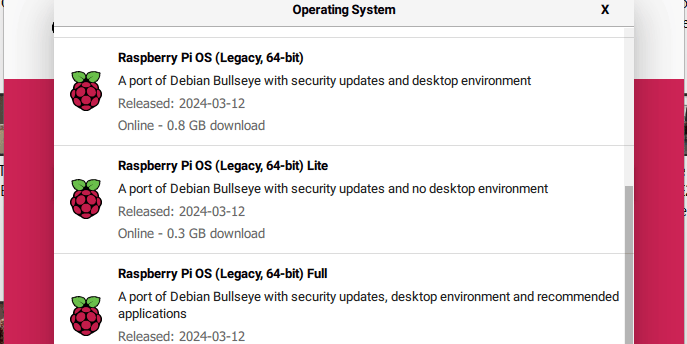
Once you have gathered all the necessary components, you can proceed to set up the Raspberry Pi Zero W 2. The first step is to download the Raspberry Pi OS Legacy 64-bit Full Install from the official Raspberry Pi website. This version of the operating system provides a complete desktop environment and is suitable for most projects. After downloading the image, you will need to flash it onto the microSD card using a tool like Etcher.
After flashing the Raspberry Pi OS onto the microSD card, insert it into the Raspberry Pi Zero W 2's microSD card slot. Connect the micro HDMI to HDMI adapter or cable to the Raspberry Pi Zero W 2 and your display. Plug in the USB keyboard and mouse into the Raspberry Pi Zero W 2's USB ports. Finally, connect the power supply to the Raspberry Pi Zero W 2 and turn it on.
The Raspberry Pi Zero W 2 will boot up and display the Raspberry Pi OS desktop environment. From here, you can configure the operating system settings, connect to Wi-Fi, and install additional software packages. If you prefer to use the Raspberry Pi Zero W 2 headlessly, you can access it remotely using SSH or VNC.
In addition to setting up the Raspberry Pi Zero W 2, you can also create a Flask API app using Python. Flask is a lightweight web framework that allows you to build web applications and APIs with ease. By combining the power of the Raspberry Pi Zero W 2 with Flask, you can create a wide range of projects, from home automation systems to weather stations.
To create a Flask API app, you will need to install the Flask library on your Raspberry Pi Zero W 2. Open a terminal window and run the following command: pip install flask. This will install the Flask library and its dependencies. Once the installation is complete, you can start building your Flask API app by writing Python code.
In conclusion, setting up the Raspberry Pi Zero W 2 is a straightforward process that requires a few essential components and some basic configuration. With the Raspberry Pi OS installed and the Flask library ready, you can begin exploring the endless possibilities of this versatile single-board computer. Whether you're a beginner or an experienced enthusiast, the Raspberry Pi Zero W 2 offers a world of opportunities for learning, creating, and experimenting.
After removing the SD card from your computer, insert it into the Raspberry Pi Zero W 2. Make sure that the power supply is disconnected before proceeding. Connect a keyboard, mouse, and monitor to the Raspberry Pi Zero W 2. Then, connect the power supply to start the device.
During the initial boot, the Raspberry Pi OS Legacy 64-bit Full Install will configure itself and prompt you to set up the system. Follow the on-screen instructions to complete the setup process. You will be asked to choose your language, keyboard layout, and set a password for the default user account.
Once the setup is complete, you will be greeted with the Raspberry Pi desktop environment. From here, you can explore the various applications and features of the operating system. The Raspberry Pi OS Legacy 64-bit Full Install provides a user-friendly interface that allows you to easily navigate through menus and access different settings.
In addition to the pre-installed applications, you can also install additional software from the Raspberry Pi Software Configuration Tool. This tool allows you to install packages, update the system, and configure various settings. It provides a convenient way to customize your Raspberry Pi Zero W 2 according to your needs.
With the Raspberry Pi OS Legacy 64-bit Full Install up and running on your Raspberry Pi Zero W 2, you can now start exploring the endless possibilities that this tiny but powerful device has to offer. Whether you want to use it as a media center, a home automation hub, or a programming platform, the Raspberry Pi Zero W 2 is capable of fulfilling your needs.
After following the steps mentioned above, you should now have your Raspberry Pi Zero W 2 connected to a display and input devices. Once the Raspberry Pi Zero W 2 is powered on and booted up, you will see the Raspberry Pi OS interface on your display. From here, you can start exploring the capabilities of the Raspberry Pi Zero W 2 and begin working on your projects.
The HDMI adapter allows you to connect the Raspberry Pi Zero W 2 to a wide range of displays, including monitors, TVs, and projectors. This gives you the flexibility to choose the display that best suits your needs. The USB Type A adapter, on the other hand, enables you to connect input devices such as a keyboard and mouse to the Raspberry Pi Zero W 2. This is essential for interacting with the Raspberry Pi OS and navigating through its interface.
It's worth noting that the Raspberry Pi Zero W 2 also supports wireless connectivity. It has built-in Wi-Fi and Bluetooth capabilities, allowing you to connect to the internet and communicate with other devices wirelessly. This opens up a whole new world of possibilities for your projects, as you can now access online resources, connect to IoT devices, and even control the Raspberry Pi Zero W 2 remotely.
In addition to the adapters mentioned earlier, you may also need other peripherals depending on your specific project requirements. For example, if you plan to use the Raspberry Pi Zero W 2 for robotics or IoT applications, you might need additional sensors, motors, or communication modules. The Raspberry Pi ecosystem offers a wide range of compatible accessories and add-ons, making it easy to expand the capabilities of your Raspberry Pi Zero W 2.
Now that you have successfully connected the Raspberry Pi Zero W 2 to a display and input devices, you can start exploring the endless possibilities that this powerful and compact device has to offer. Whether you're a beginner looking to learn programming and electronics or an experienced maker working on advanced projects, the Raspberry Pi Zero W 2 is a versatile platform that can meet your needs. So go ahead, unleash your creativity, and start building amazing things with the Raspberry Pi Zero W 2!
Creating a Flask API App using Python
Now that we have set up the Raspberry Pi Zero W 2 and connected it to a display and input devices, let's create a Flask API app using Python. Flask is a lightweight web framework that allows you to easily build web applications. Here's how to get started:
- Open a terminal on the Raspberry Pi Zero W 2.
- Install Flask by running the following command:
pip install flask - Create a new directory for your Flask app by running the following command:
mkdir flask-app - Navigate to the newly created directory by running the following command:
cd flask-app - Create a new Python file for your Flask app by running the following command:
touch app.py - Edit the app.py file using a text editor of your choice. For example, you can use Nano by running the following command:
nano app.py - In the app.py file, import the Flask module by adding the following line of code:
from flask import Flask - Create a new instance of the Flask class by adding the following line of code:
app = Flask(__name__) - Define a route for your API by adding the following lines of code:
@app.route('/') def hello(): return 'Hello, World!' - Save the app.py file and exit the text editor.
- Run the Flask app by running the following command:
python app.py - Open a web browser on your computer and enter the IP address of the Raspberry Pi Zero W 2 followed by the port number 5000. For example, if the IP address is 192.168.1.100, enter
http://192.168.1.100:5000. - You should see the message "Hello, World!" displayed in the web browser. Congratulations, you have successfully created a Flask API app using Python!
The Raspberry Pi Zero W 2 is a powerful and compact single-board computer that can be used for a variety of projects. By following this guide, you have learned how to set up the Raspberry Pi Zero W 2, install the Raspberry Pi OS Legacy 64-bit Full Install, and create a Flask API app using Python. Now it's time to explore the endless possibilities of the Raspberry Pi Zero W 2 and unleash your creativity!
In addition to creating a basic Flask API app, you can further enhance its functionality by adding additional routes and implementing various features. Flask provides a flexible and intuitive framework that allows you to easily expand your app's capabilities.
For example, you can create a route that accepts user input and performs some processing based on that input. This can be useful for building interactive web applications or creating APIs that integrate with other systems. Flask's request object allows you to access user input and perform actions accordingly.
You can also utilize Flask's templating engine to dynamically generate HTML content. This allows you to create dynamic web pages that can display different content based on user input or other factors. Flask's template engine supports various templating languages such as Jinja2, which provides powerful features for creating dynamic web content.
Another powerful feature of Flask is its support for database integration. You can easily connect your Flask app to a database and perform various database operations such as querying, inserting, updating, and deleting data. Flask supports various database systems such as SQLite, MySQL, and PostgreSQL, allowing you to choose the one that best suits your needs.
Additionally, Flask provides support for authentication and authorization, allowing you to secure your app and restrict access to certain routes or resources. This is particularly important for applications that handle sensitive user data or require user authentication.
Overall, Flask is a versatile web framework that provides a solid foundation for building web applications and APIs. Its simplicity and flexibility make it an excellent choice for beginners and experienced developers alike. By exploring Flask's documentation and experimenting with its features, you can unlock the full potential of this powerful framework and create impressive web applications with ease.
Contacts
robots.software@outlook.com
Subscribe to our newsletter
© 2024 Robots.software
Access to this site is not permitted where prohibited.
DANGER/Warning:
Implementation of any processes or procedures mentioned on this site, especially when controlling a physical robot, can result in injury and/or death depending on how it is performed. The creator of this site will not be held liable for actions taken by others based on this content. Experiment at your own risk.


(Someday we might even send one!)